Thursday, 29 September 2011

Painting and waxing the helmets.

I had a spare few hours between my lecture and seminar today so I thought I’d go paint my helmets. However before painting them they had to be prepped.


1. Using wet and dry, medium rough sandpaper we sanded the helmet under the cold tap, this works better and stops too much dust becoming airborne, until the iron powder had come to the surface and made the helmet look silvery.

2. Next we alternated rubbing wire wool and T-cut in a circular motion to bring up any scratches and give the helmet a nice finish. This was done about 3 times each in total.

3. After that had dried we applied a thin layer of Covent Garden primer to both helmets to help the paint to adhere to the surface better. However before I did this with the plastic helmet I used plastic weld to bond together the cracks around the edge of the helmet where I had a struggle getting the fibreglass out of this mould.

4. Once the primer had fully dried we could then paint the helmets.

I decided to paint the inside of both helmets a khaki brown colour so they would look of similar manufacture and then for the Fiberglassing helmet I mixed a deep forest green colour and applied that all over the top and then once it had dried applied some brown that I smeared and rubbed in using tissue into some choice areas to show a bit or wear and plot to the helmet. For the plastic one I used the green I had made for the first helmet but made it darker by adding a bit more dark brown to the mix. I applied one coat of this then allowed it to dry and the applied another. Once the second coat had just started to dry, a tacky texture, I used a dry brush and stippled the paint to create rough, sandpaper like texture. I am really happy with the way this texture looks and my choice to not sand or fill the dimples and cracks in my helmet smooth, I feel, really add to the final look.
They seem to have photographed brighter than they look.
Something to think about for future reference?

Tuesday, 27 September 2011

Fiberglassing Tommy Helmets

Andy taught us how to make a fibreglass helmet from the moulds that we made by vacuum forming.


1. Using the plastic helmet as the mould, we firstly put on 2-3 layers of wax allowing 10 minutes between each layer for it to dry.

2. Next we added a layer of spray wax on top of the others. These layers are to prevent the fibreglass from sticking to the mould.

3. We then weighed 100g of polyester gel coat and 1g of hardener into a pot. Ratio 100:1 (eg 100g of one to 1g of the other)

4. After that we added 1/3 of a cup of iron powder whilst continuously stirring until it became a thick paste.

5. We then covered the inside of the plastic mould with a thick layer of the paste and left it to dry for an hour in a warm place.

6. Next we ripped up small squares of loose weave fibreglass and an equal amount of tissue fibreglass, enough to cover the inside of the helmet with 2 layers of each.

7. Once the iron layer had dried we weighed up another 100g of lay up resin and 1g of hardener but this time with 2 drops of black pigment mixed in.

8. We then layered in squares of the fibreglass and dabbed the black resin on top to feed it through and fix down the fibreglass sheets until the mould was covered.

9. Then we repeated this with the tissue until the first layer is completely covered and smooth. We left this to dry until hard.

10. When the helmet reached a tacky stage we used a Stanley knife to cut off the extra piece on the rim as if we waited until it was completely hard it would need to be sawn off.

11. After the helmet had completely dried we pushed it out of the mould and then used a disk of sand paper to create a neat edge. Before doing this with the plastic helmet I had to cut the extra rim off with the circular blade.

Now they are ready to paint.

Monday, 26 September 2011

Seminar with Andy

We had a seminar today where we talked to Andy about the brief a bit more in depth now we have had a chance to get into the project and start to generate ideas of what to do.

Andy suggested that we look at pre war furniture and items for research as people would have items that they have had from many years previous not of date items. I also know of the ‘make do and mend’ form of recycling that was very important during the war.

We have also been told to put a narrative that will connect the props that we are going to create. I am thinking of following the british theme from the Tommy helmets we have been making.

Tuesday, 20 September 2011

Vacuum forming Tommy Helmet

Andy taught us the prop making method of vacuum forming. To do this we are making WW1 Tommy helmets which we will paint to become one of our final props.


1. He made a paper template using the research he had gathered about Tommy helmets and some measurements from sizing it up to scale from a photo of a man wearing one.

2. Then he marked half the shape of the template onto a piece of plastic and then cut out the inner template piece of the plastic using a scalpel. He added an extra bit of lip to the edge to make it easier to use as a mould later on.

3. Next he attached this plastic to a long piece of wooden dowel by the centre line side using superglue.

4. After that he got a square of wood, measuring just bigger than twice the plastic stencil on either side. He had drilled a hole the size of the dowel into the centre block.

5. He then coated this in sealing agent to stop the wood taking in the water and cracking the mould. Andy also said to put Vaseline into the hole to make the dowel spin smoothly.

6. Once he had that ready he started to mix up a bowl of plaster by sprinkling plaster powder into a bowl of warm water until there was enough that they made small islands on the surface.

7. The mixture then got stirred until it had thickened as it started to set. This is where he told us we need to work quickly.

8. By adding mounds of plaster to the centre and rotating the plastic slowly around he built up many layers to create a plaster helmet mould.

9. Once it had set, we each cut a large square of thermoplastic sheeting and took this to John the workshop technician to use it in the vacuum former.

10. We placed the plaster mould onto the shelf, with a piece of mesh underneath to stop the mould getting stuck to the table, and lowered it pulling the side lever towards us.

11. Then we placed the plastic over the space above the now lowered mould, ensuring it was square and was leaving no gaps. This was then clamped down to keep it in place.

12. Next John had us turn on the heater and pull it over the top of the plastic to make it become more malleable to mould. We were told it was ready once the plastic had gone wavy and then looked smooth again.

13. Once it was ready we pushed back the heater and then using the table lever pushed up the mould into the soft plastic and pressed start to suck out the air and create the vacuum.

14. The plastic quickly formed round the helmet and we turned off the vacuum. It was then left to go hard. (If you couldn’t make a dent it was ready)

15. We unclamped and removed the mould and then used the ban saw and circular saw to cut off any of the waste plastic.

We now have our plastic helmet moulds.

I had to do this process twice as the first time the plastic did not mould tightly around the mould on one side. John said this was because we needed to leave the plastic warm for longer as the heaters had not fully heated up yet as I was the first of the group.

The Brief

We were given the brief informing us of what this project will contain and what is expected of us. We have carried the theme of WW1 from the summer project into this and through being taught different processes by Andy we will make our own props. We also had the chance to ask any questions about the brief so as to understand it better. We are handing in some props that we will make, this blog and a sketchbook. I am still slightly unsure as to the difference between this blogs information and the sketchbook.


The brief seemed really interesting although at the moment I do not like this blog format of referencing as I started this yesterday with adding our first seminar and summer project to keep it linear and the input method of text and photo is not as easy as using a word document. However I do like the idea of having an online journal so hope to get better at using blogger.

Monday, 19 September 2011

Realism lecture

Before watching The White Ribbon Chris gave us a short lecture on Realism.

Realism is the depiction of subjects as they appear in every day life, without embellishment or interpretation.
Chris talked of the different types or realism:

• Art historical realism- people as they are/were

• Humanistic- value to the human (people orientated)
Archaic-stiff and emotionless
Classicism- the ‘ideal’ human form but morphic in movement
Realism- Made to look exactly human as it can be

We also looked at realism in the form of statues and art to compare and contrast the different forms of realism.

I found the lecture very informative and was interested in the idea of looking deeper into the meaning of art just by analyzing something that you see as a given.

The White Ribbon Review.

Image found http://www.imdb.com/title/tt1149362/
We watched a 2009 film called ‘The White Ribbon’ or ‘Die Weise band’, which is set in a small village in Germany during the First World War, directed by Michael Haneke.


The film was very suitable to our project and Chris’s lecture as it was shot with the aim of creating realism.

The long drawn out shots and un-idealistic world that the characters are placed in if far way from the normal Hollywood film that you would expect to see of such a modern making of a film. However it is not short of its cinematic trickery such as the use of black and white and shadows mimicking the style of noir to create unease and a darkened feel.

Also its lack of music and use of prolonged silences, although sometimes made the film feel dragging to a modern day audience, helped in placing you into the feel of a estranged village working on through a difficult period of history.

Image found http://www.moviecritic.com.au/2010-05/
It also looks at the behaviour of people of the time in quite detail with the inequality of the role that a female and male hold, best shown by a shot of the children leaving school, the boys running off ahead with no cares and the girls neatly and quietly walking behind, always aware of their image.
Also it showed a twistingly real versions of the family relationship in different levels of class and structures of families.

Although this film had alot of violence in different form it was never, I felt, the true theme of the film. That would be innocence, nicely symbolised in the white ribbons that get put on the children as a reminder to them.

In the story they are attempting to preserve the innocence of children, but at the same time are at times talking to and treating them like adults which is almost why the story is in a way so disturbing.

I did like the film from a cinematic study angle because of the use of shots and imagery was brilliant and beautiful but as a story I did find it at times too disturbing and slow to enjoy.

The Summer Project

For our summer project we had to create a 2 page A3 magazine spread of a journalists visit to a farm house in Flanders during the First World War. The spread had to be presented in the style of magazine such as ‘Life’ and ‘Picture Post’. From this criteria I decided to give my magazine the name Past as the name was included in all the research spreads I could find of these magazines.
I then did lots of research into the conditions of the villages in Flanders, deciding to base my story around a farmhouse in Ypres one of the worst hit and most document areas. I also looked at the people and their clothing of the time and the general look of the artefacts that could be found in their house. As my research went on I built up a background story to my family and looked into the general emotions and personal effect the war had on people at that time.
Below is the finished image of my magazine spread.
My final magazine spread

I achieved my first page by using a photograph I had found during my research that I particularly liked for this subject matter and then used Photoshop to alter it look more like the pages found in Picture Post magazine. The different layers of this image can be seen below.
To go along with this two page spread we had to create a research journal that showed all the information and images that we had gathered to create the most accurate magazine spread possible.
I enjoy this as a task and was very pleased with the outcome of my magazine spread especially as I had never done one before. 
Photoshoping the image

First Seminar

Andy taught us about the props master, the person in control of the props team on a production and leases between the different groups, and about the different types of props. This includes;
  • Hand props:
    Hero prop- most used prop and needs to be perfectly detailed
    Consumables- edible props and items that will need to be broken (ie sugar glass)
    Special effects props- these are those requiring an unusual performance
  • Set props:
    Practical props- props that will work/function when needed (eg Grandfather clock)
    Furniture
    Lights- these will be more robust than average everyday lights
  • Set dressing- ones that define the environment
    Greens- eg plants, flowers
    Costume props- eg Umberella, suitcase
However not all these props will be made as Andy explained that at times it makes more sense to buy something and sometimes age or adapt it for what you want as it may take less time and/or money to so.
We watched clips of people who work in the props industry. These showed a woman who works in the props industry and she explained the process that they go through to decide, make and buy props. It also showed the other side of this with a person who ran a prop/set pieces hiring business. They had a large collection of many different periods’ items that can be rented to be used for a show or film, and at times adapted.

Andy also gave us each a script, we had Forrest Gump, and we can to read through and mark out all the props needed for the scene and the appropriate way of getting them.
I found it interesting to hear information about the props industry from people who, at the time of the clips, were in the thick of being in props for a production.

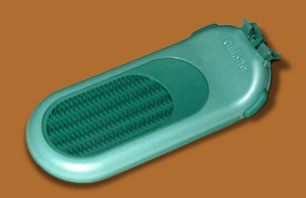
I also really liked seeing the prop transformations Andy showed us, especially the lady shaver that was used to make a communications device in one of the Star Wars films. It was interesting to know and see that firstly even in big blockbuster movies they use everyday object to make props and also to find a prop can be made of the most mundane items with a bit of creativity and know how.
A ladies gillette razor
image found: http://www.partsofsw.com/Ep_1/images/razor1.jpg

Communication device prop from Star Wars
Image found: http://www.pangilinan.net/starwars/